Arduino > Communication série
Contents (hide)
1. Clignoter une la DEL de débogage avec Chrono
/*
This code will toggle pin 13 on and off every second (1000 ms).
This should be the debug LED's pin. So the debug LED should
blink every second.
*/

// INCLUDE CHRONO LIBRARY : http://github.com/SofaPirate/Chrono
#include <Chrono.h>

// Set the led's pin
int ledPin =  13;

//Create a variable to hold the led's state
int ledState = HIGH;

// Instanciate a Chrono object.
Chrono ledChrono;

void setup()
{
        pinMode(ledPin,OUTPUT);
        digitalWrite(ledPin,ledState);
}

void loop()
{

        if (ledChrono.hasPassed(1000) ) { // returns true if it passed 1000 ms since it was started
                ledChrono.restart();  // restart the crono so that it triggers again later

                // toggle the stored state
                if (ledState==HIGH)  ledState=LOW;
                else ledState=HIGH;

                // write the state to the pin
                digitalWrite(ledPin,ledState);
        }
}
2. Clignoter deux DEL avec Chrono
// This code will toggle output 13 every 250 ms
// and will toggle output 9 every 125 ms


// INCLUDE CHRONO LIBRARY : http://github.com/SofaPirate/Chrono
#include <Chrono.h>

// Create variables for the LED pins
int ledPinA =  13;
int ledPinB =  9;

// Create variables to hold the LED states
int ledStateA = HIGH;
int ledStateB = HIGH;

// Instantiate two Chronos
Chrono chronoA;
Chrono chronoB;

void setup()
{
        pinMode(ledPinA,OUTPUT);
        digitalWrite(ledPinA,ledStateA);

        pinMode(ledPinB,OUTPUT);
        digitalWrite(ledPinB,ledStateB);

}

void loop()
{
        // Use Chrono as a metronome with an interval of 250 ms:
        if ( chronoA.hasPassed(250) ) { // returns true if it passed 250 ms since it was started
                chronoA.restart(); // restart the crono so that it triggers again later
                ledStateA = !ledStateA; // !: toggle the state from 0 to 1 or from 1 to 0
                digitalWrite(ledPinA,ledStateA);
        }

        // Use Chrono as a metronome with an interval of 125 ms:
        if ( chronoB.hasPassed(125) ) { // returns true if it passed 125 ms since it was started
                chronoB.restart(); // restart the crono so that it triggers again later
                ledStateB = !ledStateB; // !: toggle the state from 0 to 1 or from 1 to 0
                digitalWrite(ledPinB,ledStateB);
        }


}
3. Envoyer les millisecondes
#include <Chrono.h>

Chrono unMetronome;

void setup() {
        // put your setup code here, to run once:
        Serial.begin(57600);
}

void loop() {
        // put your main code here, to run repeatedly:

        if ( unMetronome.hasPassed(500) ) {
                unMetronome.restart();

                Serial.print("ms ");
                Serial.print( millis() );
                Serial.println();
        }

}
4. Envoyer l'état d'un bouton
int brocheInterrupteur = 4;

int lectureEnMemoire;

void setup() {
        // put your setup code here, to run once:
        Serial.begin(57600);

        // change INPUT_PULLUP for INPUT if your are using an external PULL_UP
        pinMode(4,INPUT_PULLUP);
}

void loop() {

        int lecture = digitalRead(  brocheInterrupteur ) ;

        if  ( lectureEnMemoire != lecture ) {
                lectureEnMemoire = lecture;

                Serial.print("interrupeteur ");
                Serial.print( lectureEnMemoire );
                Serial.println();

        }

}
5. Avec AsciiMassage
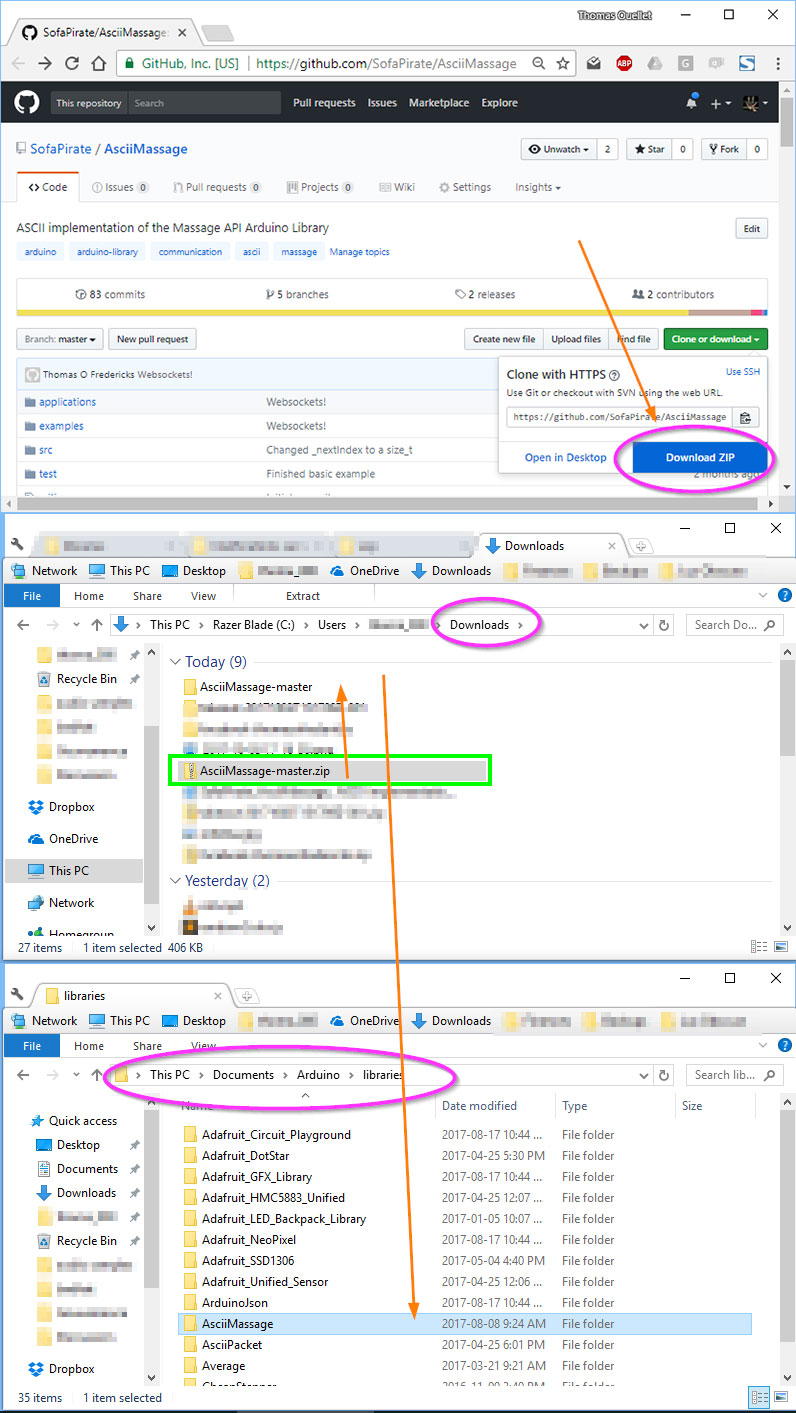
Installer la logithèque AsciiMassage ![]()

Voir les exemples inclus avec la logithèque.
5.1 Envoyer le nombre de millisecondes
// This example uses :
// * the ASCII format for packing the massage;
// * the Serial protocol for sending the massage;
// * Chrono to control the interval of the messages sent.

#include <Chrono.h>

Chrono chrono;

// Include AsciiMassagePacker.h for ASCII format massage packing.
#include <AsciiMassagePacker.h>

// Instantiate an AsciiMassagePacker for packing massages.
AsciiMassagePacker outbound;

void setup() {

        // Start the Serial protocol at 57600 baud.
        Serial.begin(57600);

}

void loop() {

        if ( chrono.hasPassed(500) ) {
                chrono.restart();

                // This is just an example of sending the number of milliseconds.
                // The application receiving the massage must expect a massage
                // with the same address ("ms" in this case).
                outbound.beginPacket("ms"); // Start a packet with the address called "value".
                outbound.addLong( millis() ); // Add the milliseconds.
                outbound.endPacket(); // End the packet.

                // Send the packet with the Serial protocol.
                Serial.write( outbound.buffer(), outbound.size() );

                // You can view the sent massages in Arduino's Serial Monitor
                // because Arduino's Serial Monitor uses the ASCII format.
        }

}
5.2 Contrôler une DEL
// A PROCESSING EXAMPLE TO COMMUNICATE WITH THIS SKETCH CAN BE FOUND  INSIDE
// "applications/Processing/AsciiMassage_Processing/" OF THE FOLLOWING DOWNLOAD :
// https://github.com/SofaPirate/AsciiMassage/archive/master.zip

// A CYCLING 74 EXAMPLE TO COMMUNICATE WITH THIS SKETCH CAN BE FOUND INSIDE
// "applications/Cycling 74 Max 7/AsciiMassenger.maxpat" OF THE FOLLOWING DOWNLOAD :
// https://github.com/SofaPirate/AsciiMassage/archive/master.zip


// MOST ARDUINOS HAVE THE DEBUG LED ON PIN 13.
int debugLedPin = 13;

// ICLUDE MASSAGE
#include <AsciiMassagePacker.h>
#include <AsciiMassageParser.h>

// PACKER(FOR SENDING) AND PARSER(FOR RECEIVING) INSTANCES.
AsciiMassageParser inbound;
AsciiMassagePacker outbound;


///////////
// SETUP //
///////////
void setup() {

        // INITIATE SERIAL COMMUNICATION.
        Serial.begin(57600);

        // SET DEBUG LEG PIN AS OUTPUT.
        pinMode(debugLedPin, OUTPUT);

}

//////////////////////
// SEND AND RECEIVE //
//////////////////////
// THE FOLLOWING FUNCTIONS ARE HELPER FUNCTIONS.
// sendPacket() SENDS OUT A MASSAGE ONCE IT IS PACKED.
// receivePacket() CHECK FOR A COMPLETED MASSAGE AND
// INDICATES WHAT TO DO WITH ITS CONTENTS.

// SEND PACKED PACKET OVER SERIAL.
void sendPacket() {
        Serial.write(outbound.buffer(), outbound.size());
}

// RECEIVE OVER SERIAL AND PARSE ASCII PACKET
void receivePacket() {
        while ( Serial.available() ) {
                // PARSE INPUT. RETURNS 1 (TRUE) IF MASSAGE IS COMPLETE.
                if ( inbound.parse( Serial.read() ) ) {
                        if ( inbound.fullMatch("d") ) {
                                digitalWrite(debugLedPin, inbound.nextInt() );
                        } else {
                                outbound.packEmpty("what?");
                                sendPacket();
                        }
                }
        }
}

//////////
// LOOP //
//////////
void loop() {

        receivePacket();

}